Segment Upload Guide
Step 1: Generate an SSH key
An SSH key is an access credential used by the SSH protocol. The function of an SSH key is similar to that of usernames and passwords, but the keys are primarily used for automated processes and for implementing single sign-on by system administrators and power users. An SSH key is an authentication credential.
The process of generating an SSH key differs depending on the OS you use.
MacOS/Linux
To generate an SSH key on Linux/MacOS, use the following steps.
MacOS only: open your command terminal.
To generate a new pair of compatible keys, run the following command under your user:
ssh-keygen -t rsa
In the process you will be prompted twice.
To provide a file name to save the key (we strongly recommend to leave it by default, just hit the “Enter” key).
Generating a public/private RSA key pair. Enter file in which to save the key (/home/<nsurname>/.ssh/id_rsa)
To provide a passphrase.
Enter a passphrase (empty for no passphrase):
Windows OS
To generate an SSH key on Windows, use the following steps.
Download and install PuTTY software.
Run
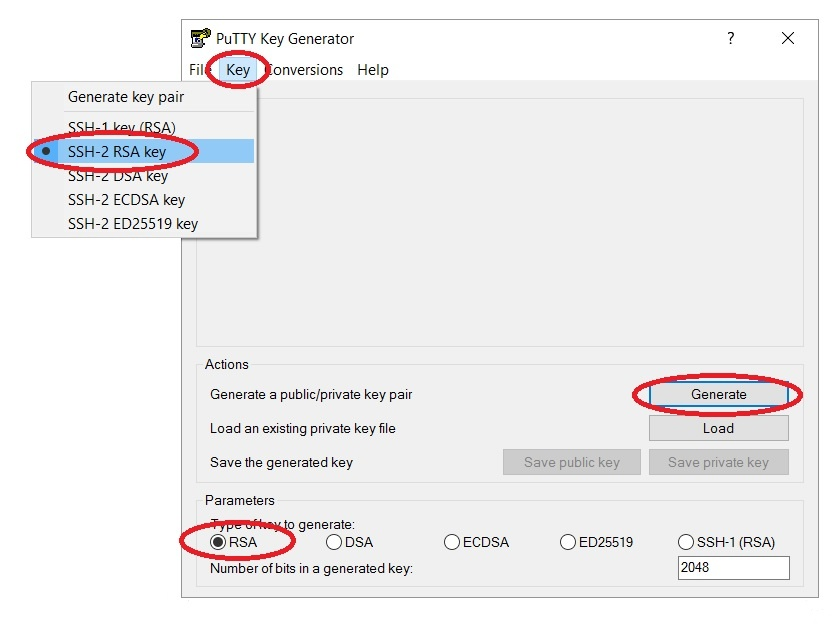
puttygenand generate a pair of keys.Switch to SSH-2 (RSA) and check the number of bits in the generated key (should be 2048). Press the “Generate” button. After the key generation starts, follow the instructions from the program.
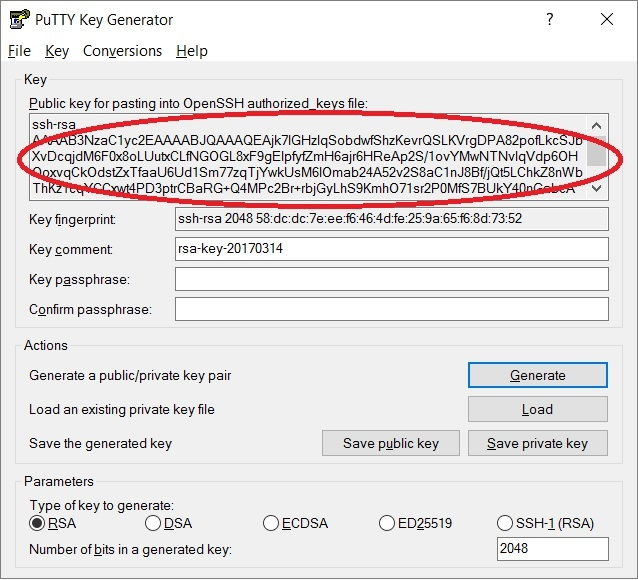
When the key is generated, press “Save private key” and “Save public key” buttons.
Create a text file and copy all symbols from the window on the top (named as: “Public key for pasting into OpenSSH authorized_keys file”).
Note
BidCore supports the following SSH encryption types.
KEX:
curve25519-sha256@libssh.orgdiffie-hellman-group-exchange-sha256
Cipher:
aes256-gcm@openssh.comaes128-gcm@openssh.comaes256-ctraes192-ctraes128-ctrchacha20-poly1305@openssh.com
MAC:
hmac-sha2-512-etm@openssh.comhmac-sha2-256-etm@openssh.comumac-128-etm@openssh.comhmac-sha2-512hmac-sha2-256umac-128@openssh.com
Step 2: Provide your SSH key to BidCore Support
Send your public SSH key to bidcore_support@iponweb.net. In response, BidCore Support provides you with credentials to the SFTP storage.
Step 3: Get SFTP software
We recommend using PSFTP (the Secure File Transfer Protocol client of PuTTY) for Windows and Linux and CyberDuck for MacOS.
Step 4: Upload segments via SFTP
To upload segments with PSFTP, use the following steps.
Launch your SFTP client.
Login to the SFTP storage using the credentials provided by BidCore Support.
Find the /upload folder.
Upload your audience segments file to the /upload directory.
Within 10 minutes, the uploaded file is fetched by the segment bot.
After the file is processed (the processing takes up to five minutes starting from the moment the file is fetched by the bot), the processing report becomes available in the /report directory. The report contains the upload status and the number of valid and invalid lines in the file.
Within two hours after the file processing, the audience segments become available for targeting in the BidCore UI.